THIS PROJECT IS NO LONGER MAINTAINED by clebert. I have updated it for use with Raspberry Pi 3's MagicMirror modules
A high performance, memory mapped, Node.js API for GPIO on the Raspberry Pi.
npm install mmm-gpio --savevar gpio = require('mmm-gpio');Creates the memory mapping with a device-specific memory offset.
You must call this function only once and before any other function.
gpio.init(function (error) {
    if (error) {
        ...
    } else {
        ...
    }
});Creates a new GPIO input function and returns it.
var input = gpio.createInput(4);Returns true if the input voltage level is high, and false otherwise.
var level = input();Creates a new GPIO output function and returns it.
var output = gpio.createOutput(4);Sets the output voltage level to high or low.
output(true);
output(false);This example needs access to the physical memory, so it must run as root.
sudo node examples/onoff.js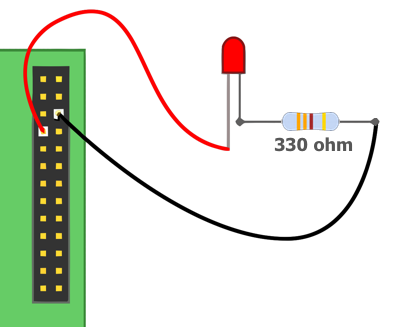
A quick word about the electronics involved. LEDs are Light Emitting Diodes and the diode part is important for us – they only pass electricity one way, so we need to make sure we put them in the right way round. They have a long leg and a slightly shorter leg. The long leg goes to the plus side and the shorter leg to the negative (or 0v) side. If we’re cut the legs short (as I have done here), then another way is to look at the side of the LED – there will be a flat section. Think of the flat as a minus sign and connect that to the 0v side of the circuit.
If we allow too much current through the LED, it will burn very bright for a very short period of time before it burns out, so we need a resistor to limit the current. Calculating the resistor value is not difficult but for now, just use anything from 270Ω to 330Ω. Anything higher will make the LED dimmer.
| Assignment | Pin | Pin | Assignment |
|---|---|---|---|
| 3.3V | 1 | 2 | 5V |
| GPIO 0 (SDA0) | 3 | 4 | 5V |
| GPIO 1 (SCL0) | 5 | 6 | GROUND |
| GPIO 4 | 7 | 8 | GPIO 14 (TXD0) |
| GROUND | 9 | 10 | GPIO 15 (RXD0) |
| GPIO 17 | 11 | 12 | GPIO 18 |
| GPIO 21 | 13 | 14 | GROUND |
| GPIO 22 | 15 | 16 | GPIO 23 |
| 3.3V | 17 | 18 | GPIO 24 |
| GPIO 10 (SPI_MOSI) | 19 | 20 | GROUND |
| GPIO 9 (SPI_MISO) | 21 | 22 | GPIO 25 |
| GPIO 11 (SPI_SCLK) | 23 | 24 | GPIO 8 (SPI_CE0_N) |
| GROUND | 25 | 26 | GPIO 7 (SPI_CE1_N) |
| Assignment | Pin | Pin | Assignment |
|---|---|---|---|
| 3.3V | 1 | 2 | 5V |
| GPIO 2 (SDA1) | 3 | 4 | 5V |
| GPIO 3 (SCL1) | 5 | 6 | GROUND |
| GPIO 4 | 7 | 8 | GPIO 14 (TXD0) |
| GROUND | 9 | 10 | GPIO 15 (RXD0) |
| GPIO 17 | 11 | 12 | GPIO 18 |
| GPIO 27 | 13 | 14 | GROUND |
| GPIO 22 | 15 | 16 | GPIO 23 |
| 3.3V | 17 | 18 | GPIO 24 |
| GPIO 10 (SPI_MOSI) | 19 | 20 | GROUND |
| GPIO 9 (SPI_MISO) | 21 | 22 | GPIO 25 |
| GPIO 11 (SPI_SCLK) | 23 | 24 | GPIO 8 (SPI_CE0_N) |
| GROUND | 25 | 26 | GPIO 7 (SPI_CE1_N) |
| ID_SD | 27 | 28 | ID_SC |
| GPIO 5 | 29 | 30 | GROUND |
| GPIO 6 | 31 | 32 | GPIO 12 |
| GPIO 13 | 33 | 34 | GROUND |
| GPIO 19 | 35 | 36 | GPIO 16 |
| GPIO 26 | 37 | 38 | GPIO 20 |
| GROUND | 39 | 40 | GPIO 21 |
- RPi Low-level Peripherals
- BCM2835 ARM Peripherals
- GPIO Examples - A single LED
- Standard Resistor Values
- Pull-up and Pull-down Resistors
To run the test suite first install the development dependencies:
npm installthen run the tests:
npm test