Hardware: ArduinoUnoR3
If you are new to automation and do not already have an Uno R3, please buy either a Teensy or ProMicro.
This section covers the required hardware for users who already have the Arduino Uno R3.
Note that Arduino Uno R3 is officially deprecated and is no longer recommended.
Why we do not support it:
- The Uno R3 and its knock-offs do not have enough memory or flash storage to run all the programs in this project.
- Many of the Uno R3's that are sold cannot be put into DFU mode. Therefore you cannot program them and they cannot be used.
- Driver support for the Uno R3 is very flaky. Sometimes it works out-of-box. Other times, it requires manually driver installation.
- The Uno R3 is complicated to use as it requires manually shorting pins and multiple actions on the computer. By comparison, Teensy has a button that does all this.
There are 2 levels of hardware setups here. How far you get into this tutorial will depend on which level you wish to achieve.
- Basic Programs: No computer control. No feedback. (Basic Hardware only)
- Advanced Programs: Computer control. Feedback optional. (Basic Hardware + Advanced Hardware)
At minimum, you will need to buy the following components:
- Arduino Uno R3
- USB-A male to USB-B male cable. (example)

Switch Lite users will also need:
- A USB hub or portable dock. (example)
The Switch Lite does not have a USB-A port. Therefore you need either an adapter or a hub to connect the Teensy. A charging hub or dock is required to simultaneously charge and use the Teensy.
Portable docks will work for the Switch Lite. It will just not be able to output video over the HDMI.
Optional Hardware:
-
If you will be using the FastCodeEntry program or if you are a heavy user in general, then it is strongly recommended to get a USB-A male-to-female cable with a power switch on it. (example)
-
If you intend to change programs very often and will be running the Switch next to a computer, then you will want a USB switch. (example) These are like USB-only KVM switches. In fact, a regular KVM switch will also work. With this, you no longer have to constantly plug/unplug USBs which will eventually wear them down.
To use any of the serial or feedback programs, you will need additional hardware.
Buy the following additional components:
- Serial Board (Pick one)
- UART Cable (CP210x controller)
- Avoid the Prolifice (PLxxxx) controllers. Many of them are knock-offs that do not work.
- CP210x board (4 for $8) | (2 for $8) | (1 for $8)
- The Adafruit UART cable is reliable and beginner-friendly, but it is also quite expensive. If you are experienced (or confident), these are some cheaper alternatives which also work. These may require a trivial amount of extra wiring.
- UART Cable (CP210x controller)
- Jumper Wires (example)
- Video capture card (example)
- HDMI cable(s)
Important: You will need a fairly powerful computer to handle serial programs with video feedback. For a single Switch with video feedback, we recommend a quad core computer no older than 2015. If you want to run 4 Switches all with feedback, we recommend a modern 8-core computer. The computer must also be running 64-bit Windows, though plan to extend support to other operating systems in the future.
There are many ways to set this up with varying cost and difficulty. We present some simple options that do not require soldering. If you are experienced with electronics, feel free to do your own thing.
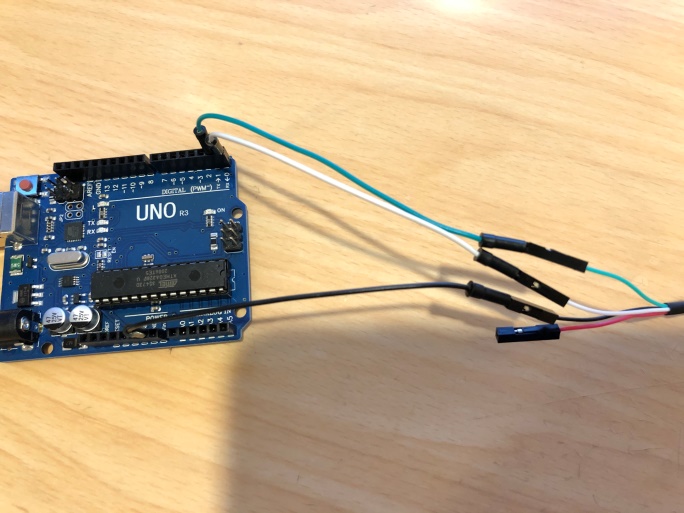
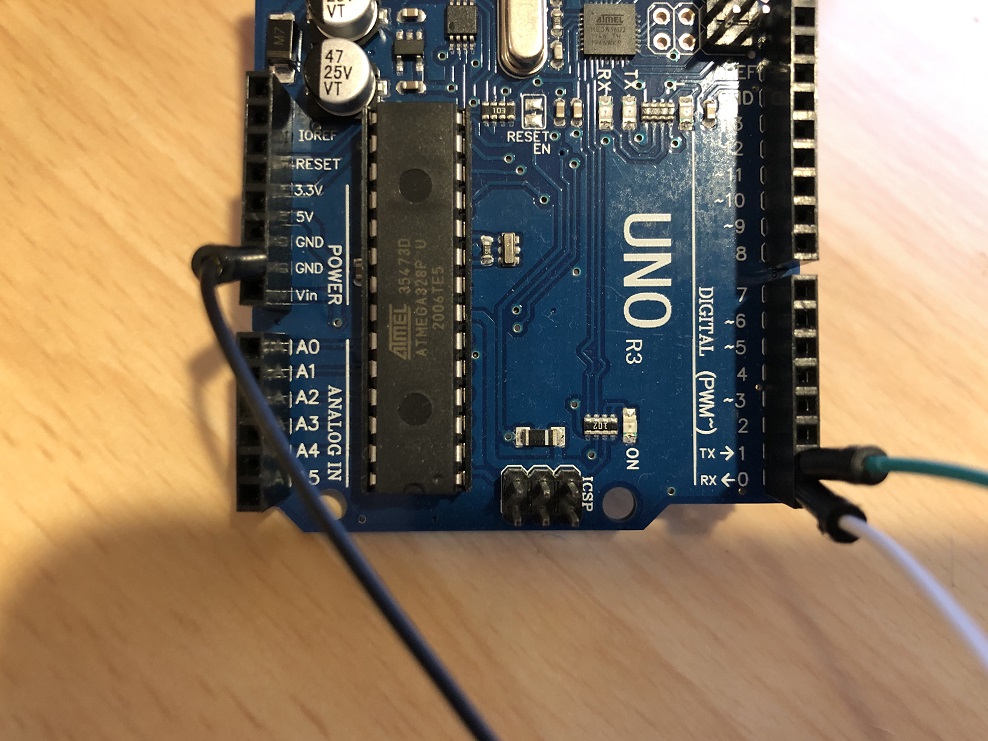
Once you have your hardware, you need to make some connections.
Make the following connections:
- UART cable green (TX) to Arduino pin1 (TX -> 1)
- UART cable white (RX) to Arduino pin0 (RX <- 0)
- UART cable black (GND) to Arduino GND (any one is fine)
- UART cable red (VCC) – leave unconnected
Discord Server:
